Documentation Index
Fetch the complete documentation index at: https://support.telivy.com/llms.txt
Use this file to discover all available pages before exploring further.
Telivy Agent Auto-Update
How Auto-Update Works
Each time an agent performs its hourly scan, before starting the scanner, it checks the update manifest. If an update is available, the system:
- Downloads the MSI (Windows) or PKG (macOS) update.
- Runs validation — hash check, certificate verification, and installer size.
- Creates update metadata and launches the installer upgrade.
- Shuts down the agent, completes the upgrade, and restarts it.
- On restart, the agent detects the previous update metadata and sends a final confirmation that the update succeeded.
If the update is unsuccessful, an error message with a log is sent to the backend. The agent will retry the upgrade up to 3 times before stopping further attempts.
Configuring Auto-Update
Auto-update settings follow a priority hierarchy. More specific settings always override broader ones:
| Level | Priority | Scope |
|---|
| Account | #3 (lowest) | Applies to all assessments and machines |
| Assessment | #2 | Overrides account settings for all machines in the assessment |
| Machine | #1 (highest) | Overrides both account and assessment settings for a specific machine |
The system uses the most specific setting available. For example, if auto-update is enabled at the assessment level, the setting applies to all machines in that assessment unless overridden at the machine level.
This allows granular control: you can enable auto-updates broadly at the account level, test beta versions on a few machines first, or disable updates for specific machines that require stability.
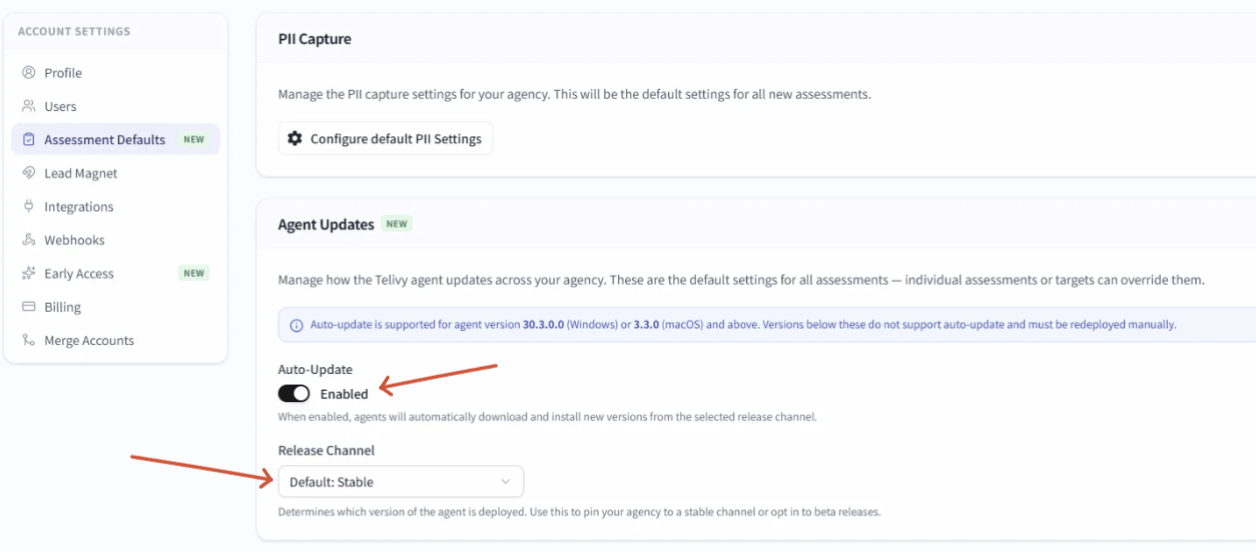
Account Level
Navigate to Account Settings -> Assessment Defaults: https://portal.telivy.com/agent/account/assessments
Use the switch to turn on the feature and select the Release Channel. For the account level, Stable is recommended.
Assessment Level
Navigate to a specific Assessment -> Setup -> 2. Deploy Agents -> Deployment Status.
Click Update Settings to open the Assessment Update Settings dialog.
Here you can override account settings with assessment-specific settings.
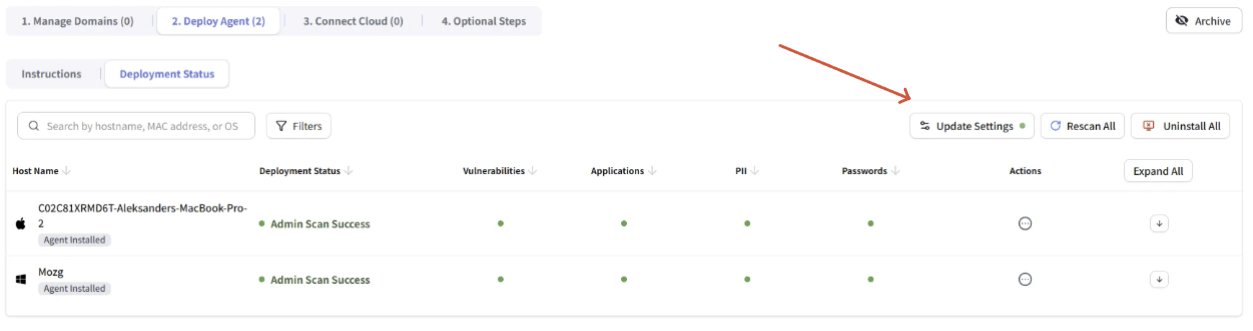
Minimum agent version required: Auto-update requires agent version 30.3.6.1 (Windows) or 3.3.0 (macOS). Agents running older versions do not support auto-update and must be redeployed manually.
Options:
- Auto-Update — Check “Override account setting” to set a different auto-update toggle for this assessment. The dialog shows the current inherited status (e.g., “Currently enabled (inherited from account)”).
- Release Channel — Check “Override global default setting” to select a different channel for this assessment.
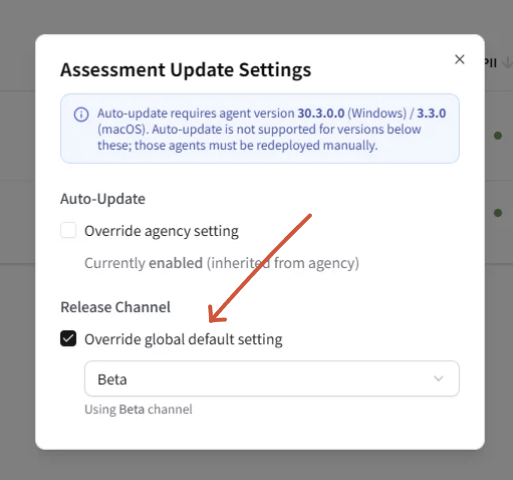
Machine Level
Navigate to a specific Assessment -> Setup -> 2. Deploy Agents -> Deployment Status, then open the Actions menu for a specific machine.
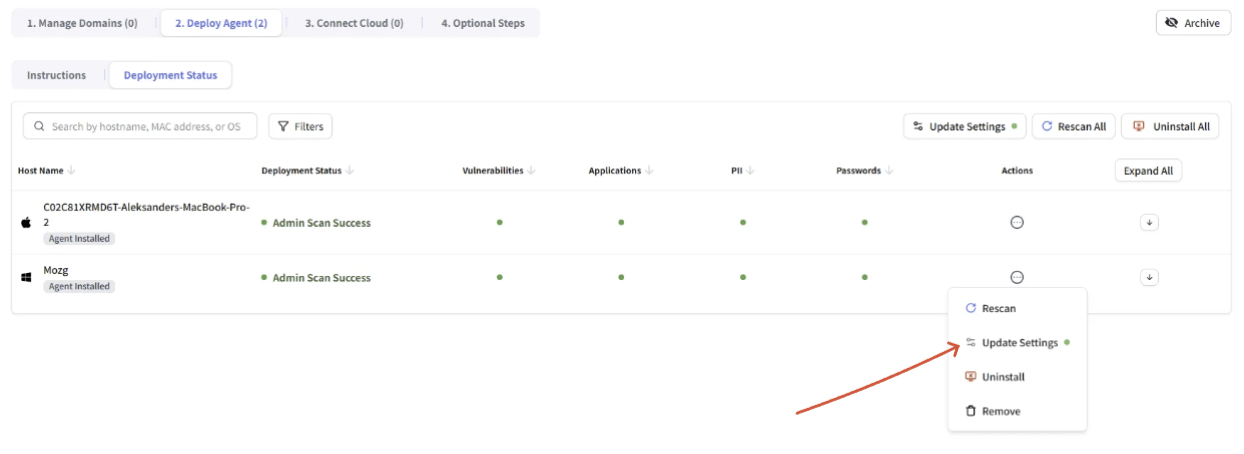
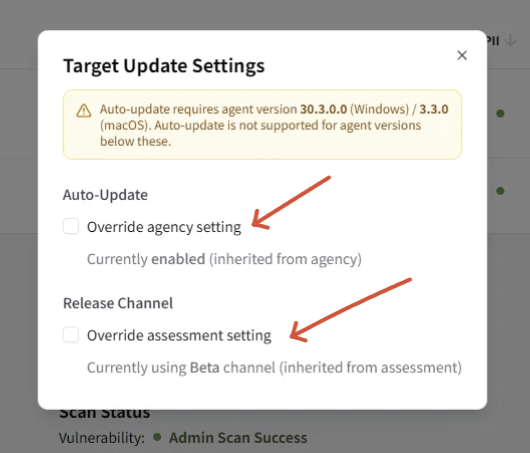
Select Update Settings to open the Target Update Settings dialog.
Here you can override both account and assessment settings for an individual target.
Options:
- Auto-Update — Check “Override account setting” to enable or disable auto-update for this specific machine. The dialog shows the current inherited status (e.g., “Currently enabled (inherited from account)”).
- Release Channel — Check “Override assessment setting” to assign a different channel to this machine. The dialog shows the inherited channel (e.g., “Currently using Beta channel (inherited from assessment)”).
Release Channels
| Channel | Purpose |
|---|
| Stable | Production-ready releases, recommended for most deployments |
| Beta | Pre-release versions for early testing |
Select the release channel at whichever configuration level is appropriate for your deployment strategy. The Stable channel is recommended for production environments.
Configuration Examples
Example 1 — Enable auto-update for all clients: Set Auto-Update to Enabled at the Account level with the Stable channel. All assessments and machines inherit this setting automatically.
Example 2 — Test beta on one assessment: Keep the Account level on Stable. Override the Release Channel to Beta on a single assessment. All machines in that assessment receive beta updates while everything else stays on Stable.
Example 3 — Test beta on specific machines only: Keep the Account level on Stable. Override individual machines to the Beta channel via the Machine Level settings. Only those specific machines receive beta updates.
Example 4 — Opt a machine out of auto-update: Enable auto-update at the Account or Assessment level. Override a specific machine’s Auto-Update setting to Disabled. That machine will not auto-update while all others continue as configured.
Frequently Asked Questions
Q: What happens if an update fails? The agent logs the error, sends the log to the backend, and retries the upgrade up to 3 times. If all retries fail, the agent continues running on its current version.
Q: Do I need to uninstall the old agent before updating? No. The auto-update process performs an upgrade-in-place. Manual uninstallation of the previous version is not required.
Q: What is the minimum agent version that supports auto-update? Windows: 30.3.6.1 | macOS: 3.3.0. Agents running older versions must be redeployed manually with a current installer.
Q: How often does the agent check for updates? The agent checks the update manifest every hour, before each scheduled scan.
Q: Can I mix Stable and Beta across my environment? Yes. The priority hierarchy (Account < Assessment < Machine) allows you to run different channels at different levels. For example, you can keep your account on Stable while testing Beta on a specific assessment or individual machines.